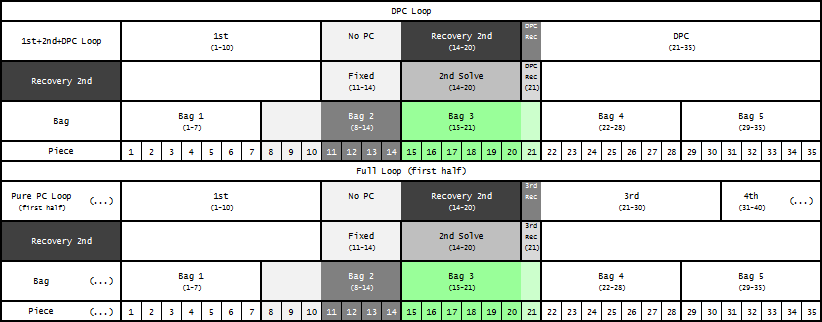
Recovery 2nd PC

Fig: Recovery 2nd PC bag structure. Last 4 pieces of Bag 2 have already been placed before you start. Includes DPC Recovery, which involves placing the extra piece in a specific spot compatible with a DPC setup.
Minimal Setups
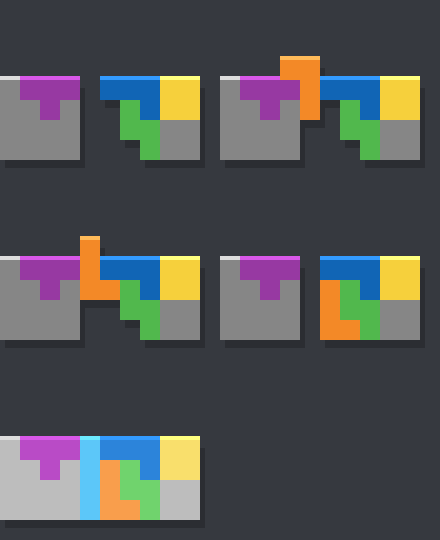
| Recovery 2nd | Residue | From 1st | |
|---|---|---|---|
| Tub + Vert I |
⭐ Tub + Vertical I
|
⭐ Jigsaw
|
(PCO)
|
| Factory OT (100%) |
⭐ Factory OT (100%)
|
- |
⭐ PCO
|
| Factory OX (99.68%) |
⭐ Factory OX (99.68%)
|
- |
⭐ PCO
|
Recovery 2nd PC setups marked with ⭐ have 100% combined build cover and 100% solve rate (or 100% recovery into Recovery DPC).
You must learn these setups in order to always be able to loop using Recovery 2nd PC following respective 1st PC setups.
Refer to the From 1st columns to see which Recovery 2nd PC setups are needed for which 1st PC setup.
Optional Setups
| Recovery 2nd | Residue | From 1st | |
|---|---|---|---|
| Tub + Hori I |
Tub + Horizontal I
|
(Jigsaw)
|
- |
| Heart + PCO |
Heart + PCO
|
- |
(PCO)
|
Included because these setups may be preferred over minimal setups in terms of simplicity/scoring/saved pieces.
Tub 2nd
Tub + Vertical I 2nd
Better saves than Tub + Horizontal I 2nd, but harder to solve.
| PC% | Recovery Minimals | Recovery DPC | Unique Solves | Minimal Solves |
|---|---|---|---|---|
| 100.00% | - | - | 105 unique ↗️ | 7 minimal ↗️ |
| PC% | Rec% | TSD% | TSS+% | Tet% | Bad% |
|---|---|---|---|---|---|
| 100.00% | - | 0.00% | 0.00% | 43.57% | 56.43% |
| O | OS | OST | T | TO | No S |
| 97.98% | 99.76% | 99.76% | 0.00% | 97.98% | 99.13% |
Minimals (7)
Extra (7)
Extra Save O (7)
Rather than memorising minimals, it's easier to just solve box using a larger number of simple solves.
The last 180 minimal is the only one you need to memorise.
Tub + Vertical I has 0.24% forced save I. These queues are OSZ<I<JL<T. This solve requires 180:

Fig: Tub + Vertical I forced save I minimal 180 spin.
Forced save I can be avoided by placing O at the wall:
Sometimes it's possible to get extra Tet with 180:

Fig: Tub + Vertical I Tet 180 spin.
🩹 Tub + Vertical I on the wrong side Recovery
If you build Tub + Vertical I on the wrong side, those 0.24% forced save I queues actually become fail queues. In that case, use this recovery:
Tub + Horizontal I 2nd
Simpler to solve than Tub + Vertical I 2nd, but worse saves.
| PC% | Recovery Minimals | Recovery DPC | Unique Solves | Minimal Solves |
|---|---|---|---|---|
| 100.00% | - | - | 28 unique ↗️ | 2 minimal ↗️ |
| PC% | Rec% | TSD% | TSS+% | Tet% | Bad% |
|---|---|---|---|---|---|
| 100.00% | - | 0.00% | 0.00% | 57.14% | 42.86% |
| O | OS | OST | T | TO | No S |
| 92.50% | 100.00% | - | 0.00% | 92.50% | 96.19% |
Minimals (2)
Extra (4)
Extra Save O (2)
Factory 2nd
Factory 2nd is a setup family. Factory setups vary depending on whether space divisions are connected to the central box segment or disconnected.
Factory variants with O space connected to box space can use solves that span the space division boundary. Always build one of these variants.
Factory variants with O space connected to box space can use 180 solve that makes use of the side being only 2 high.
Factory variants with T space connected to box space can use 180 solve that makes use of the side being only 3 high.
| Factory Variant | Space Divisions | ||||||
|---|---|---|---|---|---|---|---|
|
✅ Factory OT (100%)
|
|
✅ | ✅ | ✅ | ✅ | ||
|
✅ Factory OX (99.68%)
|
|
✅ | ✅ | ❌ | ✅ | ||
|
❌ Factory TX (98.33%)
|
|
❌ | ❌ | ✅ | ✅ | ||
|
❌ Factory XX (97.14%)
|
|
❌ | ❌ | ❌ | ✅ | ||
Always build variants with O space connected to box space.
Factory variants with O space connected to box space can use solves that span the space division boundary:
Factory OT (100%) 2nd
| PC% | Recovery Minimals | Recovery DPC | Unique Solves | Minimal Solves |
|---|---|---|---|---|
| 100.00% | - | - | 51 unique ↗️ | 7 minimal ↗️ |
| PC% | Rec% | TSD% | TSS+% | Tet% | Bad% |
|---|---|---|---|---|---|
| 100.00% | - | 0.00% | 0.00% | 35.71% | 64.29% |
| O | OS | OST | T | TO | No S |
| 38.25% | 99.92% | 99.92% | 0.00% | 38.25% | 70.12% |
Minimals (7)
Extra (2)
Factory variants with O space connected to box space can use 180 solve that makes use of the side being only 2 high:

Fig: Factory OT/OX variants-exclusive 180 spin.
Factory variants with T space connected to box space can use 180 solve that makes use of the side being only 3 high:

Fig: Factory OT/TX variants-exclusive 180 spin.
All Factory variants can use this 180 to increase Tet chance:


Fig: Factory universal 180 spins.
Factory OX (99.68%) 2nd
| PC% | Recovery Minimals | Recovery DPC | Unique Solves | Minimal Solves |
|---|---|---|---|---|
| 99.68% | 1 | S (wall) S (mid) | 50 unique ↗️ | 8 minimal ↗️ |
| PC% | Rec% | TSD% | TSS+% | Tet% | Bad% |
|---|---|---|---|---|---|
| 99.68% | 100.00% | 0.00% | 0.00% | 34.52% | 65.48% |
| O | OS | OST | T | TO | No S |
| 38.25% | 99.05% | 99.05% | 0.00% | 38.25% | 68.61% |
Minimals (8)
Extra (1)
Factory variants with O space connected to box space can use 180 solve that makes use of the side being only 2 high:

Fig: Factory OT/OX variants-exclusive 180 spin.
All Factory variants can use this 180 to increase Tet chance:


Fig: Factory universal 180 spins.
🩹 Factory Recovery
Depending on which column you placed the first O, you will be able to go into S Recovery DPC (at the wall) or S Just be careful not to clog the holes for T and second of J/L with S/Z you dumped on top.
This recovery can also be used to avoid the forced save I minimals.
O in the middle Recovery
Recovery (1)
O at the wall Recovery
Recovery (1)
Heart + PCO 2nd
Very difficult to solve without a method.
| PC% | Recovery Minimals | Recovery DPC | Unique Solves | Minimal Solves |
|---|---|---|---|---|
| 100.00% | - | - | 50 unique ↗️ | 9 minimal ↗️ |
| PC% | Rec% | TSD% | TSS+% | Tet% | Bad% |
|---|---|---|---|---|---|
| 100.00% | - | 0.00% | 0.00% | 20.00% | 80.00% |
| O | OS | OST | T | TO | No S |
| 86.90% | 98.73% | 100.00% | 31.19% | 93.81% | 99.13% |
Minimals (9)
Extra Save O (5)
Assuming you're following up with DPC, look for solves in the following order:
- Save O Tet solves (minimals 1-2)
- Save O JLSZ qb skims (minimal 3, extras 2-4)
- Save O JLT qb skims (minimal 4, extras 5)
- Save S 3x4 box annoying minimals (minimals 5-6)
- Save S 5x4 box (minimals 7-8)
- Save T 5x4 box (minimals 9)
Space divisions make finding solves simpler:
Box solves
Annoying minimals
JLSZ qb skims
Changelog
- 2022-12-16
- Created Recovery 2nd PC page
- Added minimal setup - Tub + Vertical I
- Added minimal setup - Factory OT (100%)
- Added minimal setup - Factory OX (99.68%)
- Added optional setup - Tub + Horizontal I
- Added optional setup - Heart + PCO